Timeline and Design File
Web experiments are often composed of several parts presented in sequence. For example, we might show a welcome page → informed consent → instructions → etc.
Smile provides a central "sequencing" feature which makes it easy to configure, customize, and move through different stages of an experiment. We call this the "timeline."
The timeline feature is more than just a way to control the presentation order of different phases. It also acts as a way to prevent subjects from doing things in the tasks that you might not want. For example, in many web-based experiments if the subject reloads the webpage the task will start over. Although researchers often add a warning about this, it would allow subjects to repeat the instructions after seeing the task, accidentally participate in multiple conditions, or start over if they make a mistake to increase their bonus. Smile's timeline logic prevents this by controlling the flow of the experiment even across reloads of the webpage. For instance, when properly configured, a subject in a Smile experiment can close their browser, restart their computer, and come back to the experiment on the same trial they left off on.
This page shows how to configure and control Smile's timeline implementation, and how to customize it with more complex behaviors.
The Design File (design.js)
Perhaps the most important user-configurable file in a Smile experiment is the design file located at design.js in your project root. This file is where you configure the timeline of your experiment. You can take a look at the default version of this file which is short, self-explanatory, and well commented.
The design file sets up the sequence of Views that the participant will encounter, and it can configure Branching/Randomized Flows if needed to create different timelines for different experimental conditions. It is very likely you will need to edit this file to create your experiment!
The following sections of this page describe the technical details of the Timeline object and how to configure your design file.
Single-page Applications and Routing
Smile runs as a Single-page Application (SPA) — a single HTMLshell that uses JavaScript to swap content in and out as participants move through the experiment, without round-trips to the server for every new page. There's a small stack underneath the timeline:
- Nuxt — the meta-framework that wraps Vue. The
@nyuccl/smile-nuxtmodule setsssr = falseso each experiment runs purely client-side (no server-rendered HTML, no hydration step). - Vue Router — Nuxt's built-in router, which maps URLs to Vue components. The module registers a handful of catch-all routes (
/:slug(.*)*,/dev/:slug(.*)*,/presentation/:slug(.*)*) so the timeline's named views resolve at any URL. - Smile's
Timelineclass — sits on top of Vue Router and adds the ordered sequencing semantics: which view comes next, navigation permissions, randomized branches, persistence across reloads.
You don't interact with Nuxt's router or Vue Router directly in everyday work — design.js configures the timeline and the module handles the routing details. The timeline is all you need to wire up for most experiments.
URLs and Routes
A few notes on the URL shape your experiment uses.
Base URL. This is the deploy URL to your experiment — protocol, domain, and any subpath, e.g. https://exps.gureckislab.org/. Configured via VITE_CODE_NAME_DEPLOY_URL / VITE_DEPLOY_URL in your project's .env (see Configuration).
HTML5 history mode, not hash mode. Smile uses standard HTML5 history URLs, so paths look like https://exps.gureckislab.org/consent — not /#/consent. (The deploy server is responsible for routing every path under the base URL to your index.html; Vercel's preset handles this automatically.) Each timeline view's name becomes its path by default: name: 'consent' ⇒ /consent, name: 'debrief' ⇒ /debrief. You can override with an explicit path: in the view object if needed.
Module-provided route shapes. Three URL spaces come pre-wired:
| Path | What it serves |
|---|---|
/... | Your timeline. Each view name maps to a path; / resolves to the first view. |
/dev/... | Developer mode (sidebar, route jumper, data inspector, autofill, dev console). |
/presentation/... | Presentation mode (clean view for screenshots and demos). |
You'll mostly see and link to the top-level paths. The dev and presentation paths come along for free via the module — you don't add them in design.js.
The dual purpose of named paths is also a debugging affordance: because each view has a stable URL, you can jump directly to any section of the experiment in dev mode without playing through everything before it.
Timeline
As just described, the Vue Router is a mapping between different URLs and Vue components (i.e., Views) to load. However, in experiments, we often want to step through content sequentially. For this purpose, Smile implements a simple Timeline class (auto-imported by the module) which acts as a wrapper around the basic Vue Router.
The timeline class allows you to configure a sequence of Views as well as allow for Views that are not part of a sequence:
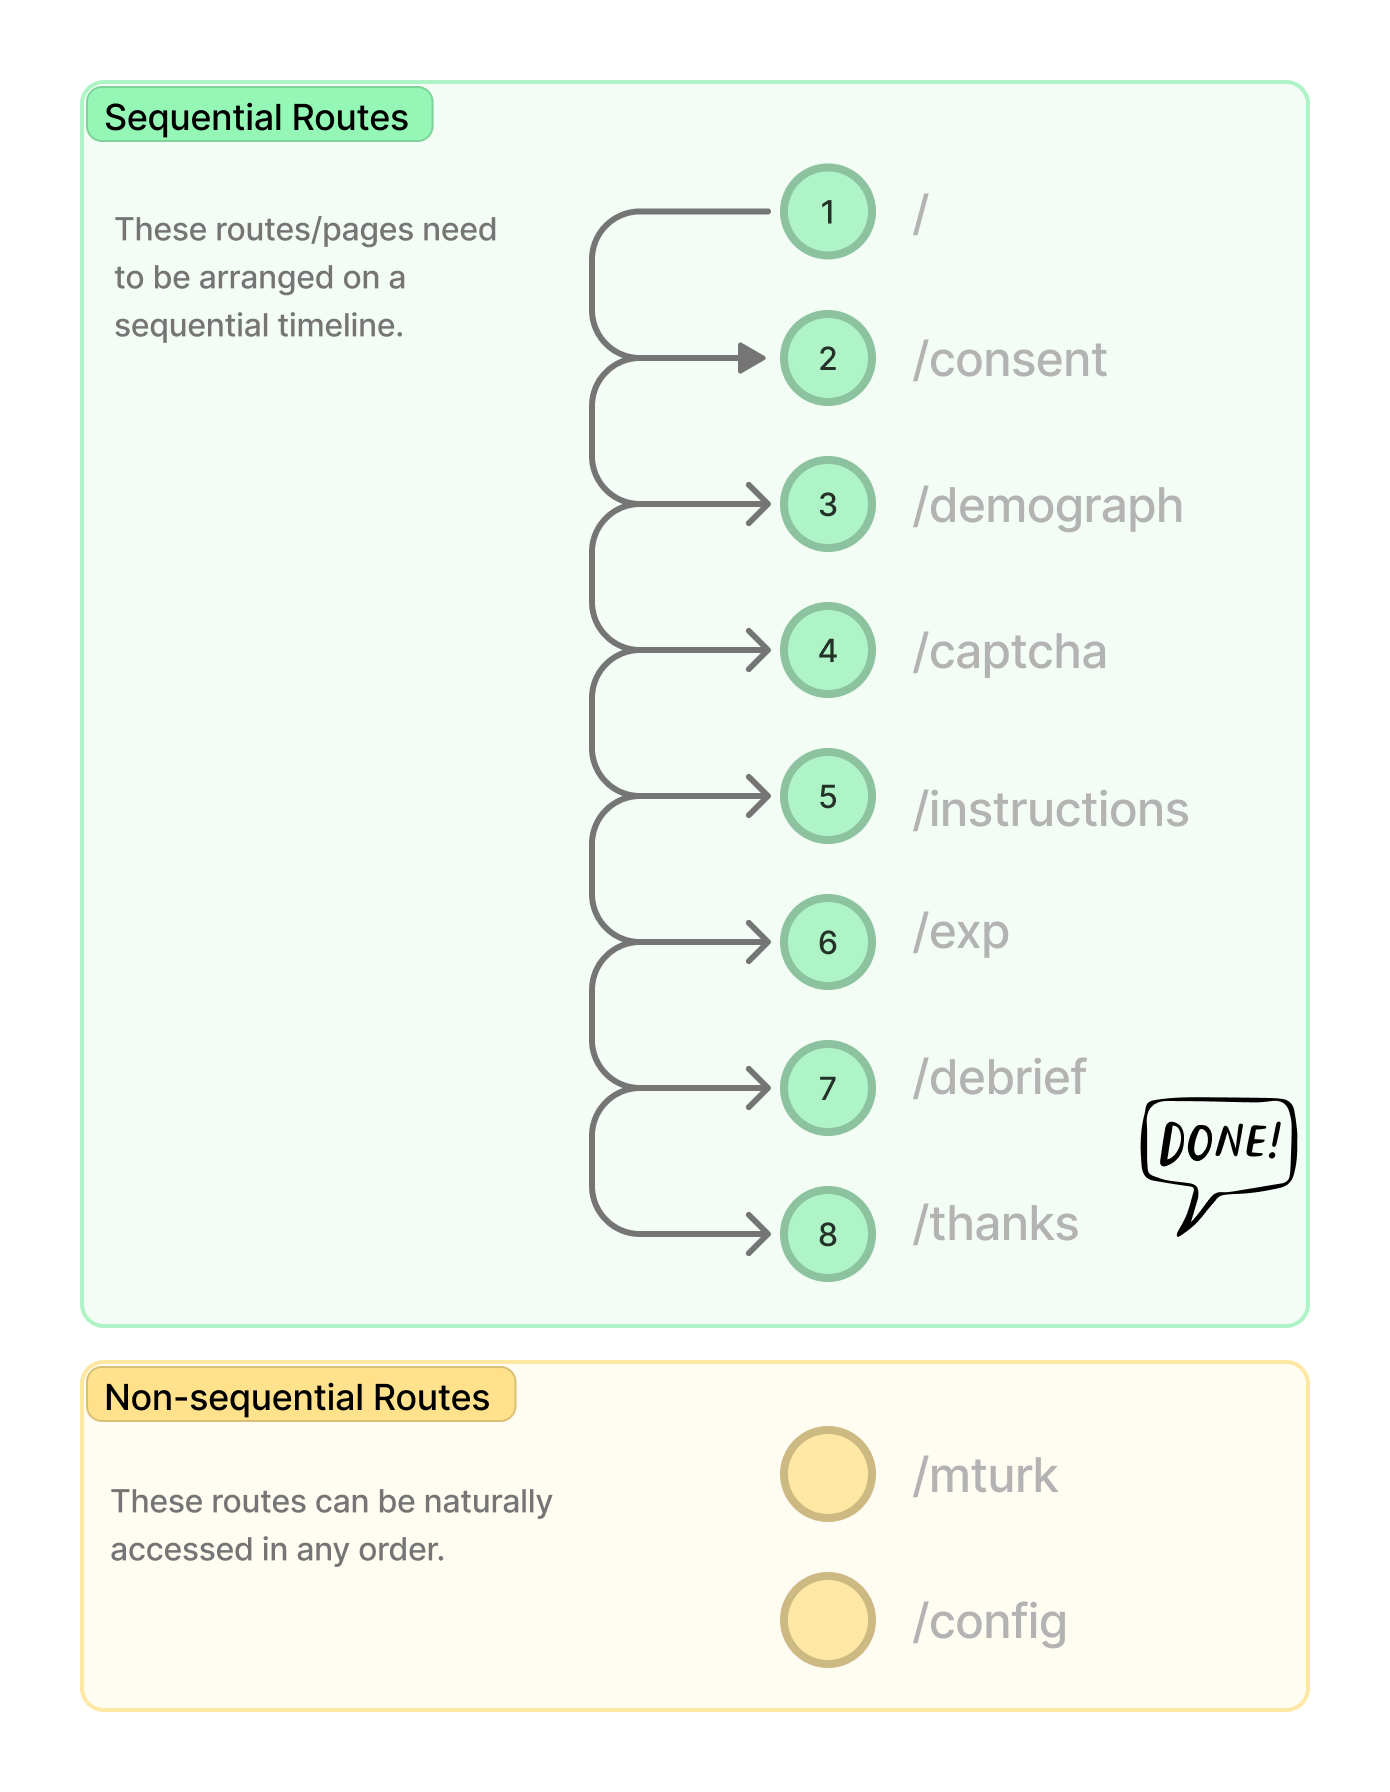
Sequential Views are accessed in a timeline. Non-sequential Views are not part of that timeline.
The View object
Each View is specified by a javascript object, which usually contains at least the following fields:
{
  name: 'my_name',
  component: MyViewComponent,
  meta: { ... },  // optional
}
By default, if you do not provide a path in the object (as in the example above), the client-side route will be automatically set to match the name. For example, the path in the example above would be set to /my_name. See details in the vue-routerdocumentation for more information on name vs. path. The component field specifies the View component that should be loaded when the route is requested.
If you'd like to specify a different path (that doesn't match the name), you can do that:
{
  name: 'my_name',
  path: '/testcomponent'
  component: MyViewComponent,
  meta: { ... },  // optional
}
The meta field specifies additional optional information about the View:
- It can be used to specify different previous and next Views, in case the experiment timeline flow branches (see Branching and randomized flows for more details).
- It can also be used to allow direct navigation to particular Views, which can allow for unconditional navigation by setting
allowAlways: truein themeta. - It can be used to block access to particular Views until the user has consented to the study (
requiresConsent: true) as well as only showing content when the user is "done" with the experiment (requiresDone: true). Another option (requiresWithdraw: true) requires the participant to have withdrawn from the page before showing. - It can be used to set a particular state when leaving a View (e.g.
meta: { setDone: true },will set thedonestate totruebefore entering the next View). Similarlymeta: { setConsented: true }will set theconsentedstate before entering the next View. These are provided in the timeline to make it more obvious when consent or completion has occurred in your timeline.
IMPORTANT
It is important that your timeline (design.js) actually uses meta: { setDone: true } and meta: { setConsented: true } so that other aspects of your experiment work correctly. For instance the setConsented is used to create an initial database record for the subject. If this step is passed the data will not be created. Similarly repeat participation is controlled by the done state. If this is not set correctly the subject be prevented from starting the experiment again or not access the final page.
Components: string names vs. markRaw()
The component field accepts two kinds of values, and the right choice depends on whether you're using a built-in view from the module or a custom view from your own project.
Built-in views — pass a string:
timeline.pushSeqView({
  name: 'consent',
  component: 'InformedConsentView', // string name, no import needed
})
Built-ins (AdvertisementView, InformedConsentView, DemographicSurveyView, WindowSizerView, InstructionsView, InstructionsQuiz, DebriefView, DeviceSurveyView, TaskFeedbackSurveyView, ThanksView, WithdrawView) are auto-registered as global Vue components by @nyuccl/smile-nuxt. Referencing them by string name lets the timeline defer component lookup until render time — which is also what makes the override-by-name pattern work.
Custom views — import the file and wrap with markRaw():
import { markRaw } from 'vue'
import MyTaskView from './components/MyTaskView.vue'

timeline.pushSeqView({
  name: 'task',
  component: markRaw(MyTaskView), // must be markRaw'd
})
The same rule applies to component props that hold component definitions (e.g., the informedConsentText and debriefText props):
import { markRaw } from 'vue'
import InformedConsentText from './components/InformedConsentText.vue'

timeline.pushSeqView({
  name: 'consent',
  component: 'InformedConsentView',
  props: {
    informedConsentText: markRaw(InformedConsentText),
  },
})
Why markRaw()?
A Vue component definition is a plain object that should be treated as static configuration — not reactive data. When you pass an imported component directly into a reactive context (props, refs, anything Pinia touches), Vue's reactivity system wraps it in a Proxy. That breaks internal optimizations, logs console warnings about marking components reactive, and can cause subtle bugs.
markRaw() tells Vue "this object is plain configuration — don't try to make it reactive." String-named built-ins skip this issue because the timeline only stores the name; the component is resolved later by Vue's component registry, never going through reactive wrapping.
Plain .js files don't get auto-import
Nuxt auto-imports work in .vue files but not in design.js (which is plain JS). So even though markRaw is auto-imported in your view components, design.js needs the explicit import { markRaw } from 'vue' line at the top. Same goes for Timeline (auto-imported in design.js specifically because the module registers it as an auto-import) — but your own custom components still need explicit imports here.
Overriding a built-in view
There are two ways to replace a built-in view with one of your own. Both are fully supported — pick based on how much explicitness you want.
Approach A — Explicit import (recommended)
Create a component with any name in your project's components/ folder, import it in design.js, and pass it with markRaw(). This mirrors how the starter handles MyTaskView and StroopExpView:
import { markRaw } from 'vue'
import MyCustomConsent from './components/MyCustomConsent.vue'

timeline.pushSeqView({
  name: 'consent',
  component: markRaw(MyCustomConsent),
  meta: { requiresConsent: false, setConsented: true },
})
You pick the filename, you control the props, the override is visible in design.js. This is the recommended default.
Approach B — Drop-in by name
Drop a file with the exact same name as the built-in into components/. The string reference in design.js automatically resolves to your local version, no design.js change needed:
components/InformedConsentView.vue ← overrides the built-intimeline.pushSeqView({
name: 'consent',
component: 'InformedConsentView', // now resolves to your local file
meta: { requiresConsent: false, setConsented: true },
})This works because the module registers built-ins with priority: -1 and a components:extend hook ensures your override inherits the global flag needed for string-based <component :is> resolution. It's convenient for a quick swap; less explicit than Approach A.
Override limits for UI and layout components
Approaches A and B both work for view components (the ones you push to the timeline). But overrides of UI primitives like Button, Input, Card, or layout helpers like CenteredContent, TwoCol, don't propagate into the module's pre-compiled view templates. If you drop components/Button.vue into your project, your version shows up in your own .vue files, but the <Button> used inside the module's InformedConsentView keeps the module's version — those references were baked in when the module was published.
Workaround: override the entire view (using Approach A or B), then use your custom Button inside that override.
Troubleshooting overrides
If your override doesn't seem to be taking effect, check the following in order:
- Filename matches the built-in exactly. The drop-in override is name-based —
informedConsentView.vuewon't shadowInformedConsentView.vue. Match the source's PascalCase. - The file is in
components/at the project root, not a subfolder and notsrc/components/. The starter'scomponents/is the dir Nuxt scans. - You're overriding a view, not a UI primitive used inside one. Dropping
components/Button.vuewon't change buttons inside a pre-compiled module view likeInformedConsentView— see the warning above for the compile-time vs runtime distinction. - The dev server has picked it up. A newly-created file occasionally misses an HMR cycle. If your change doesn't apply, stop the dev server (
Ctrl+C) and runpnpm devagain. - Vite's pre-bundle cache isn't stale. If the browser console shows
504 (Outdated Optimize Dep)errors orFailed to fetch dynamically imported module, hard-refresh the tab (Cmd+Shift+R). As a last resort, deletenode_modules/.cache/vite/and restart. - For slot-content overrides (e.g.,
InformedConsentText), the built-in view consumes content viaapi.setAppComponent(...)— make sure that registration is still present indesign.js. This is not the same mechanism as a same-name view override.
Creating a timeline
Your design.js exports a createTimeline(api) function. The api parameter is the API object — @nyuccl/smile-nuxt passes it in when it calls your function. Inside, instantiate the timeline:
// Timeline is auto-imported by the module
export default function createTimeline(api) {
  const timeline = new Timeline(api)
  // ...
  timeline.build()
  return timeline
}
There are four key methods available on the timeline instance:
timeline.pushSeqView(view_obj)
Pushes a new View (specified in view_obj) into the sequential timeline. The first call to this function will make the configured View the first View in the sequence, the second call will make it the second View in the sequence, and so on. The format of view_obj should correspond to the View object discussed above.
timeline.registerView(view_obj)
This registers a new View (specified in view_obj) without adding it to the timeline. This View will exist in the Vue router but will not be in the timeline sequence. This is useful for configuration and debugging Views, as well as View you want to define and even link to but not present in the regular timeline flow. The notation registerView, as opposed to the push... method, is meant to indicate that the View is not part of the sequence.
timeline.build()
This should be called to construct the sequence. It takes the configured timeline and figures out which View is the successor or predecessor of each (allowing for manual overrides using the meta field).
Here is an example configuring three sequential routes and one non-sequential route. The built-in AdvertisementView and ThanksView are passed by string; the custom Instructions.vue and Config.vue are imported and wrapped in markRaw():
import { markRaw } from 'vue'
import Instructions from './components/Instructions.vue'
import Config from './components/Config.vue'

export default function createTimeline(api) {
  const timeline = new Timeline(api)

  // first route — built-in
  timeline.pushSeqView({
    path: '/',
    name: 'welcome',
    component: 'AdvertisementView',
  })

  // second route — custom component
  timeline.pushSeqView({
    path: '/instructions',
    name: 'instructions',
    component: markRaw(Instructions),
  })

  // third route — built-in
  timeline.pushSeqView({
    path: '/thanks',
    name: 'thanks',
    component: 'ThanksView',
  })

  // a non-sequential route available for debugging
  timeline.registerView({
    path: '/config',
    name: 'config',
    component: markRaw(Config),
  })

  timeline.build()
  return timeline
}
During development you can, of course, comment out certain Views to help isolate and test particular aspects of your experiment. In addition, since Views are mapped to distinct URLs, it is easy to jump between sections of your experiment during development (especially using the developer mode tools).
Branching and randomized flows
Simple branching flows
Sometimes you need timeline structures a little more complex than a simple sequence. For example, there might be multiple initial landing pages depending on if you come in from a particular recruitment service:

To configure this we need multiple routes (1a and 1b in the figure) to all point to the same successor. We can do this using Vue router meta fields. In particular, when we create a sequential route we can configure a specific successor using meta: {next: 'some_name'} (or predecessor using meta: {prev: 'some_name'}):
// first route
timeline.pushSeqView({
  name: 'first',
  meta: { next: 'second' }, // this should jump to a specific route (by name)
  component: markRaw(FirstComponent),
})

// alternative first route
timeline.pushSeqView({
  name: 'first_alternate',
  meta: { next: 'second' }, // this should jump to a specific route (by name)
  component: markRaw(AlternativeFirstComponent),
})

// second route
timeline.pushSeqView({
  name: 'second',
  component: markRaw(SecondComponent),
})

// third route
timeline.pushSeqView({
  name: 'third',
  component: markRaw(ThirdComponent),
})

timeline.build()
Using this approach, you can configure fairly complex branching flows through pages.
Note: the timeline.build() method steps through all Views pushed using pushSeqView(). For each View, it makes the next field in meta point to the next View in the timeline and prev field in meta point to the previous View in the timeline. If this is not what you want (because your Views need more complex flows) you can simply omit the build step and set the next and prev fields manually for each View.
Alternative flows and branching
Sometimes you want to randomize the order or presentation of Views. For example, your experiment might have two tasks, which are presented in a randomized order. Or, you might have four tasks, and you want one group of participants to see two of the tasks and the other group to see the other two tasks. We call these "alternative flows":

These alternative flows can be accomplished by adding nodes, which you can think of as containing several paths of Views and guiding participants along one of those paths. There are two types of nodes: randomized and conditional.
Randomized nodes
Let's say you want participants to see a page of instructions and then complete two tasks, which should be presented in a random order across participants. After the two tasks, you want to show the debrief View. Here's what your design.js file might look like:
import { markRaw } from 'vue'
import Instructions from './components/Instructions.vue'
import Task1 from './components/Task1.vue'
import Task2 from './components/Task2.vue'
import Debrief from './components/Debrief.vue'

export default function createTimeline(api) {
  const timeline = new Timeline(api)

  // push instructions (sequential)
  timeline.pushSeqView({
    name: 'instructions',
    component: markRaw(Instructions),
  })

  // register tasks (not yet placed in the timeline — they'll be
  // pulled in by the randomized node below)
  timeline.registerView({
    name: 'task1',
    component: markRaw(Task1),
  })

  timeline.registerView({
    name: 'task2',
    component: markRaw(Task2),
  })

  // push randomized node with two orderings — each option is a list of
  // route names (strings) referring to the routes registered above
  timeline.pushRandomizedNode({
    name: 'randomOrder',
    options: [
      ['task1', 'task2'],
      ['task2', 'task1'],
    ],
  })

  // push debriefing form
  timeline.pushSeqView({
    name: 'debrief',
    component: markRaw(Debrief),
  })

  timeline.build()
  return timeline
}
Note that the Views that make up each path are registered (added with the registerView method), not pushed (with the pushSeqView method). The node describes the two paths is pushed (with the pushRandomizedNode method).
You can adjust the probabilities of the paths by specifying weights—if you want the first path to be twice as likely as the second path, for example, you could do that like this:
timeline.pushRandomizedNode({
  name: 'randomOrder',
  options: [
    ['task1', 'task2'],
    ['task2', 'task1'],
  ],
  weights: [2, 1],
})
Note that the weights are automatically normalized, so [2/3, 1/3] or [4, 2] would generate the same distribution.
Conditional nodes
The View order can also be set by which condition the participant is assigned to, using random condition assignment. This can be more useful than a simple randomized node if other aspects of the experiment will depend on the condition. Here's an example:
import { markRaw } from 'vue'
import Instructions from './components/Instructions.vue'
import TaskA from './components/TaskA.vue'
import TaskB from './components/TaskB.vue'

export default function createTimeline(api) {
  const timeline = new Timeline(api)

  // assign participants to a condition specifying task order
  api.randomAssignCondition({
    taskOrder: ['AB', 'BA'],
  })

  // push instructions
  timeline.pushSeqView({
    name: 'instructions',
    component: markRaw(Instructions),
  })

  // register the tasks (not yet in the timeline)
  timeline.registerView({
    name: 'taskA',
    component: markRaw(TaskA),
  })

  timeline.registerView({
    name: 'taskB',
    component: markRaw(TaskB),
  })

  // push a conditional node — the per-condition values list registered
  // route names to play in order for participants in that condition
  timeline.pushConditionalNode({
    name: 'ConditionalRandom',
    taskOrder: {
      AB: ['taskA', 'taskB'],
      BA: ['taskB', 'taskA'],
    },
  })

  timeline.build()
  return timeline
}
It's also possible to have nested nodes. In the example below, there are two conditions: task order, and variation. Participants first see tasks A and B in a counterbalanced order (based on the task order condition). Then, separately, participants are randomly assigned to see either task C or task D afterwards (based on the variation condition):
import { markRaw } from 'vue'
import TaskA from './components/TaskA.vue'
import TaskB from './components/TaskB.vue'
import TaskC from './components/TaskC.vue'
import TaskD from './components/TaskD.vue'

export default function createTimeline(api) {
  const timeline = new Timeline(api)

  api.randomAssignCondition({ taskOrder: ['AB', 'BA'] })
  api.randomAssignCondition({ variation: ['C', 'D'] })

  // the tasks (registered, not yet placed)
  timeline.registerView({ name: 'taskA', component: markRaw(TaskA) })
  timeline.registerView({ name: 'taskB', component: markRaw(TaskB) })
  timeline.registerView({ name: 'taskC', component: markRaw(TaskC) })
  timeline.registerView({ name: 'taskD', component: markRaw(TaskD) })

  // the inner node — registered, referenced by the outer node by name
  timeline.registerConditionalNode({
    name: 'InnerConditionalRandom',
    variation: {
      C: ['taskC'],
      D: ['taskD'],
    },
  })

  // the outer node (pushed) — its options can reference both individual
  // registered views and the inner node by name
  timeline.pushConditionalNode({
    name: 'ConditionalRandom',
    taskOrder: {
      AB: ['taskA', 'taskB', 'InnerConditionalRandom'],
      BA: ['taskB', 'taskA', 'InnerConditionalRandom'],
    },
  })

  timeline.build()
  return timeline
}
Using the Timeline
Navigating between Views
So far, we've told you how to set up the Timeline in the design.js file. But how do you actually use the Timeline within each View? How do you get from one View to the next?
In each View, we need to tell the Timeline when that component is "finished," allowing the Timeline to pass control to the next View in the sequence. To do this, the API includes three navigation functions: goNextView(), goPrevView(), and goToView(view_name).
Here is a complete, simple SFC component that imports the API and uses it to advance to the next route in the sequence when the user clicks a button (calling the finish() method):
<script setup>
// useAPI and Button are auto-imported by @nyuccl/smile-nuxt
const api = useAPI()
function finish() {
api.goNextView()
}
</script>
<template>
<div class="page">
<h1 class="title is-3">Experiment</h1>
<Button variant="success-light" @click="finish()">
next <i-fa6-solid-arrow-right />
</Button>
</div>
</template>IMPORTANT (and helpful!)
One important feature of these navigation functions are that they calls saveData() on the global store prior to View changes. So as a result, you can trust that your data will be saved/synchronized with the persistent store (Turso/libsql) whenever you navigate between sequential Views. See the data storage docs on automatic saving. This only works if you use the API to advance between Views.
Navigation permissions
In developer mode any View can be accessed in any order. However, in live mode (when a participant is accessing the experiment), the timeline enforces a strict order of Views. This is to prevent participants from re-starting the experiment or skipping ahead to the end. However, there are some exceptions to this rule. For example, it is possible to configure any particular View to the reachable from any other View using the meta field (allowAlways: true).
In addition, certain programmatic navigations are always allowed. For example, if the subject had already read the instructions then if a button or link was provided like this:
<a href="/#instructions" class="button">Instructions</a>It would be disallowed in live mode because the subject would be skipping back using a browser navigation event (to the browser, this will appears the same as if the subject modified the URL in the browser directly). However, if the same link was implemented using an internal API navigation function it would be always allowed:
<script setup>
// useAPI is auto-imported
const api = useAPI()

function go_to_instructions() {
  api.goToView('instructions')
}
</script><button class="button" @click="go_to_instructions()">
Jump to instructions
</button>The premise here is that if the programmer set up a situation where navigation was requested progamatically, it should be allowed. For the first link type, it is unclear whether the programmer or the participant constructed the request. As a result, it should be disallowed.
Special Set-up Options
Repeating a task more than once
The View permissions mean that participants move through the phases of your study in a predictable and determined way. However, at the end of a study they might be allowed to repeat the task. To allow repeats, set VITE_ALLOW_REPEATS=true in your project's .env file.
Then, in the last View of your experiment, set the resetApp field:
// thanks/submit page — built-in view by string name
timeline.pushSeqView({
  name: 'thanks',
  component: 'ThanksView',
  meta: {
    requiresDone: true,
    resetApp: api.getConfig('allowRepeats'),
  },
})
When this is set, the next request to the app will reset the app to the start deleting the local storage and allowing the participant to start the experiment again. If VITE_ALLOW_REPEATS is not set, then the app will not allow a participant to repeat any part of the task again.
Running custom code before route loading
Sometimes you want to run a little bit of code prior to loading a View. You can do this using route guards, a feature of the Vue Router. Route guards are traditionally used to prevent navigation to a View or redirect it. Here is an example using the Smile Timeline object.
// welcome screen — built-in view referenced by name
timeline.pushSeqView({
  name: 'welcome',
  component: 'AdvertisementView',
  beforeEnter: (to, from) => {
    console.log(to, from)
  },
})
The beforeEnter method runs before the View is loaded. This can be helpful for doing computation prior to the View loading. For example, after the user consents to the study it might make sense to create a database record for them. So we might add a special method to the View after the consent form to handle that.
Smile's module registers global route guards internally (for consent, done-state, and presentation-mode enforcement); per-view beforeEnter guards layer on top of those.
Note that Vue Router provides a variety of lifecycle hooks that you can customize for all or individual routes. See the documentation here for a full accounting of the order in which things occur.